Skip to content

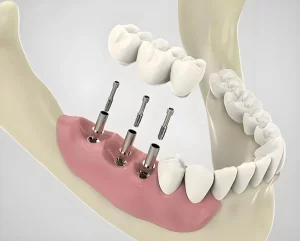
In the field of dental restoration, especially in implant procedures, impression copings (also known as impression abutments) play a crucial role. Serving as the bridge between the dental implant and the final restoration (such as a crown or denture), the accuracy of the impression coping directly determines the fit and functional outcome of the restoration. By precisely capturing the position and orientation of the implant, impression copings provide essential information to dental laboratories for fabricating custom restorations that seamlessly integrate and function optimally. Therefore, for dental professionals striving for the best restorative results, selecting the appropriate impression coping is not only a technical requirement but also a vital responsibility in ensuring successful patient outcomes.
This guide aims to explore the various types of dental implant impression abutments, their specific applications, and their unique advantages, helping dental practitioners gain a deeper understanding of this critical component. Whether you are a newcomer to the field or an experienced expert, understanding the characteristics and optimal use of different impression copings can significantly enhance surgical precision and patient satisfaction. Next, let’s delve into how to select the most suitable impression coping based on specific needs to ensure that every implant restoration achieves the best clinical results.
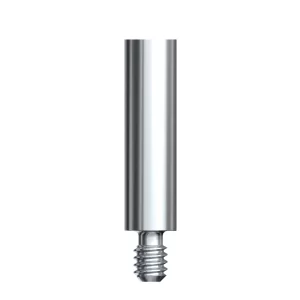
What is impression coping?
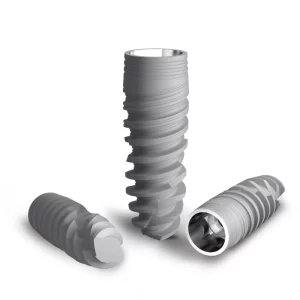
An impression coping plays a crucial role in the dental implant restoration process, serving as the bridge between the implant and the impression material. When a dentist needs to take an impression for a dental implant, the impression coping comes into play. It is precisely placed on top of the implant, functioning as a custom interface that ensures the impression material accurately captures the implant’s position, angulation, and its relationship with surrounding oral structures. This high-precision capture is essential for fabricating crowns or dentures in the laboratory, as it guarantees that the implant analog aligns perfectly with the actual implant, ensuring the accuracy and comfort of the final restoration.
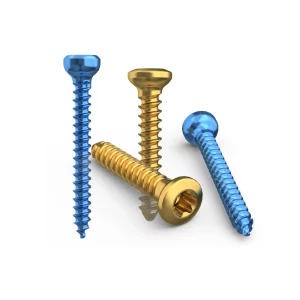
Impression copings are typically made from durable and biocompatible materials such as titanium or specific plastics. To accommodate various implant brands and systems, they are designed in multiple sizes and models to meet diverse clinical needs.
Types of Impression Copings
In the dental implant restoration process, impression copings are essential components for obtaining accurate impressions. They are primarily classified into two types: open-tray impression copings and closed-tray impression copings.
Open-Tray Impression Copings
Open-tray impression copings feature a unique design that allows direct access to the implant. The coping’s screw extends beyond the tray, enabling the impression tray to be removed easily without locking the coping in place. This design not only simplifies the procedure but also ensures precise capture of the implant’s exact position, enhancing the accuracy of the impression. Open-tray impression techniques are particularly effective for multiple implants or edentulous cases, providing a more precise solution. The coping extends through an opening in the impression tray and embeds into the impression material. Before removing the impression, the screw is loosened through the tray’s opening, leaving the coping within the impression to accurately replicate the implant’s position.
Closed-Tray Impression Copings
Closed-tray impression copings remain embedded in the impression material and are especially suitable when implants are well-aligned and easily accessible. This design is particularly advantageous in cases with limited space or when patients have difficulty opening their mouths wide. Additionally, the closed-tray technique is relatively simple, preventing the impression from getting locked in the patient’s mouth and reducing discomfort. After the impression material sets, the coping is unscrewed from the implant and placed back into the impression, accurately capturing the implant’s position to ensure precise fabrication of the final restoration.
How to Use Impression Copings
The proper use of impression copings is essential to accurately capturing the position of dental implants during the impression-taking process. As the connection between the implant and impression material, correctly using impression copings is crucial for the precise fabrication of the final restoration. Below is a step-by-step guide on how to use closed-tray and open-tray impression copings.
Closed-Tray Impression Coping
The steps for using a closed-tray impression coping are as follows:
- Preparation Stage: Ensure that the soft tissue around the implant is healthy, free of inflammation, and that the implant has fully osseointegrated.
- Coping Installation: Accurately place the closed-tray impression coping onto the implant, ensuring a secure and stable connection without any looseness.
- Select Impression Material: Choose a suitable impression material, such as silicone rubber, based on clinical needs.
- Take the Impression: Inject the impression material into the tray, making sure it fully covers the impression coping and accurately captures the position and orientation of the implant.
- Material Setting: Wait for the impression material to fully set according to the manufacturer’s instructions.
- Remove the Impression: Once the material has set, carefully remove the tray, ensuring the impression remains intact.
- Inspect the Impression: Examine the impression to confirm it is clear and accurate, without bubbles or defects.
Open-Tray Impression Coping
The steps for using an open-tray impression coping are as follows:
- Preparation Stage: Ensure that the soft tissue around the implant is healthy, free of inflammation, and that the implant has fully osseointegrated.
- Coping Installation: Securely attach the open-tray impression coping to the implant, ensuring the coping’s screw extends beyond the tray.
- Select Impression Material: Choose the appropriate impression material according to clinical requirements.
- Take the Impression: Inject the impression material into the tray, ensuring it flows through the tray’s opening to fully cover the implant and impression coping.
- Material Setting & Removal: Once the impression material has fully set, loosen the impression coping screw through the tray opening, then carefully remove the tray while maintaining the integrity of the impression.
- Inspect the Impression: Check the impression to ensure it has accurately captured the implant’s position and orientation, without any bubbles or defects.
By following these steps, both closed-tray and open-tray impression copings can be effectively used to capture the precise position of dental implants, ensuring accuracy for the fabrication of the final restoration.
Advantages of Using Precision Impression Copings
Using precision impression copings in the dental implant impression-taking process offers significant advantages. These benefits contribute to improved treatment outcomes, protection of teeth and gums, enhanced efficiency, optimal fit of restorations, and increased patient satisfaction.
Improved Impression Accuracy
- Precision impression copings accurately capture the position and orientation of the implant, ensuring that the impression closely matches the actual implant morphology.
- High-accuracy impressions serve as the foundation for fabricating high-quality restorations, improving their fit and stability.
Protection of Teeth and Gums
- Impression copings are typically made from high-quality elastic materials such as silicone or rubber, allowing them to adapt to different tooth shapes and sizes for a comfortable experience.
- During the impression-taking process, the coping covers the teeth and gums, preventing direct contact with impression materials, thereby reducing irritation and potential damage.
Enhanced Treatment Efficiency
- Precision impression copings minimize errors and the need for repeated procedures, streamlining the impression-taking process.
- An efficient impression-taking process helps shorten the patient’s treatment timeline, reducing the number of visits and wait times.
Ensured Restoration Fit
- Impressions taken using precision impression copings allow for the fabrication of restorations that fit implants more accurately, minimizing gaps and looseness between the restoration and implant.
- A well-fitting restoration enhances stability and durability, reducing the risk of dislodgement or damage.
Increased Patient Satisfaction
- High-quality impressions result in restorations that better conform to the patient’s oral condition.
- Comfortable and stable restorations contribute to improved quality of life, boosting patient confidence and satisfaction with the treatment.
How Do I Choose the Right Impression Coping Size?
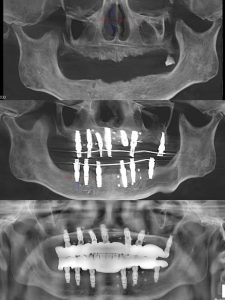
In dental restorations, selecting the correct impression coping size is a crucial step. The healing abutment serves as the foundation for shaping the natural physiological contour of the final restoration. Its size must be carefully chosen to accommodate the patient’s gingival thickness, the desired prosthetic appearance, and the condition of the keratinized tissue. Typically, the healing abutment should extend 1–2 mm above the gingival level to achieve optimal results. Importantly, the diameter of the healing abutment and the final abutment is not solely determined by the implant fixture but is largely influenced by the gingival morphology of the tooth being restored and its relationship with adjacent teeth.
Choosing the appropriate healing abutment size is essential for ensuring that the final restoration is both aesthetically pleasing and functionally effective. Based on this, the selection of the impression coping size is equally important. The diameter of the impression coping must match that of the healing abutment to ensure a precise fit between the final abutment and the prosthesis. Providing the dental laboratory with accurate impression data, including the compatibility between the impression coping and the healing abutment, is key to fabricating a well-fitted prosthesis.
Common Mistakes to Avoid When Using Impression Copings
When taking impressions for dental implants, it is crucial to avoid errors that could compromise accuracy and reliability. To ensure a precise and high-quality impression, pay special attention to avoiding the following common mistakes:
Incorrect Installation of Impression Coping
- Mistake: The impression coping is not properly seated on the implant, resulting in looseness or misalignment.
- Potential Impact: This can lead to an inaccurate impression of the implant’s position and orientation, affecting the fit and stability of the final restoration.
- Prevention: Before installation, ensure the implant surface is clean and dry. Follow the instructions carefully to correctly seat the impression coping, ensuring a tight and stable fit.
Improper Selection of Impression Material
- Mistake: Using an unsuitable impression material, such as one with poor flowability, long setting time, or low tear resistance.
- Potential Impact: This may compromise the accuracy and durability of the impression, leading to deformation or breakage.
- Prevention: Choose an appropriate impression material based on clinical needs, ensuring good flowability, an optimal setting time, and sufficient tear strength.
Errors During Impression-Taking Process
- Mistake: Improper tray placement, insufficient or excessive impression material, or failure to fully seat the tray.
- Potential Impact: This can result in bubbles, defects, or failure to accurately capture the implant’s morphology.
- Prevention: Ensure the tray is correctly positioned, use an appropriate amount of impression material, and seat the tray in one smooth motion without repositioning.
Insufficient Setting Time for Impression Material
- Mistake: Removing the impression tray before the material has fully set.
- Potential Impact: Premature removal can cause deformation or tearing of the impression, compromising accuracy and durability.
- Prevention: Follow the manufacturer’s instructions and allow the impression material to fully set before removing the tray.
Improper Removal of Impression
- Mistake: Applying excessive force or using incorrect techniques when removing the impression, leading to deformation or breakage.
- Potential Impact: A damaged impression may be unusable, requiring a retake.
- Prevention: Gently and carefully remove the impression using the correct technique to avoid unnecessary stress or damage.
Poor Handling of the Impression
- Mistake: Failing to properly handle or store the impression after removal, such as prolonged exposure to air or improper storage conditions.
- Potential Impact: The impression may become contaminated, deformed, or damaged, affecting its accuracy and usability.
- Prevention: Immediately clean, disinfect, and store the impression properly after removal to prevent exposure to contaminants or environmental changes.
Conclusion
Impression copings play a crucial role in dental restorations, particularly in the impression-taking process for dental implants. They ensure the accurate transfer of implant positions, providing a precise foundation for the fabrication of crowns and prosthetics. For dental professionals, understanding the types, proper usage, and best practices of impression copings is key to achieving optimal restoration outcomes.
By using impression copings correctly and avoiding common mistakes, clinicians can significantly enhance the quality of dental restorations. Accurate impressions not only help create well-fitting restorations that improve patient comfort but also extend the lifespan of the prosthetic. Furthermore, the use of impression copings streamlines workflows and improves treatment efficiency.
In summary, the importance of impression copings in dental restorations cannot be overlooked. By following best practices and ensuring their proper use, clinicians can enhance restoration quality, increase patient satisfaction, and optimize workflow efficiency.
FAQs
1. What is an impression coping?
An impression coping is a tool used in dental restorations to capture an accurate impression, particularly in implant procedures. It consists of two main parts: a rigid impression coping that connects to the implant or abutment, ensuring stability, and a soft material (such as silicone or rubber) that covers the tooth and gingiva to form a precise impression. The primary function of an impression coping is to accurately transfer the implant’s position, providing a precise foundation for the fabrication of crowns and prosthetic teeth.
2. How do I choose the right impression coping size?
Selecting the correct impression coping size requires considering multiple factors. First, the diameter of the impression coping should match the healing abutment to ensure accuracy and stability. Additionally, factors such as the patient’s gingival thickness, the desired prosthetic appearance, and the amount of keratinized tissue should be taken into account. Typically, the healing abutment should extend 1–2 mm above the gingival level, and the impression coping must accommodate this height while ensuring that the impression material fully captures the tooth and gingiva. Furthermore, the height and shape of the impression coping should match the patient’s oral condition to avoid unnecessary pressure or damage to the teeth and gingiva.
3. What does “coping” mean in dental terminology?
In dental terminology, a coping refers to the inner structure of a crown, which is the part that comes into contact with the tooth. It is used to protect the tooth, enhance its strength, and provide support for the crown. In implant dentistry, a coping may refer to the connection structure on the implant that links with the impression coping or final abutment, ensuring a precise fit for the crown.
4. What is the difference between an impression coping and an impression post?
Impression copings and impression posts are both used in dental restorations for impression-taking but serve different roles. An impression coping is typically used to connect with the implant or abutment, ensuring stability during impression-taking. Its shape and size vary based on the implant type and the patient’s oral condition. An impression post, on the other hand, is used in conjunction with the impression coping to guide the impression material to the implant site, forming an accurate impression. Impression posts often have internal structures (such as an octagonal shape) that match the implant to ensure precision and stability. In some cases, both components are used together as part of a complete impression-taking system.
5. How can I determine if the impression coping is seated correctly?
Ensuring that the impression coping is correctly seated is crucial for an accurate impression and a high-quality final restoration. You can verify its placement using the following methods:
- Visual inspection: Check if the impression coping fits snugly against the implant or abutment, without any visible gaps or misalignment.
- X-ray confirmation: Take an X-ray to confirm the impression coping’s position and angle.
- Tactile examination: Gently feel around the impression coping with your fingers to ensure it fits tightly against the tooth and gingiva without any gaps or air bubbles.
- Post-curing inspection: After the impression material has set, inspect the impression for completeness, clarity, and any distortions or fractures. If the impression coping is not properly seated, the impression may be deformed or incomplete, affecting the quality of the final restoration.
6. What are the three types of dental impressions?
In dental restorations, impressions are typically classified into three types:
- Preliminary impression: Used for an initial assessment of the patient’s oral condition to determine implant position and angle. Preliminary impressions are rough but provide sufficient information for further treatment planning.
- Working impression: Used to fabricate the final restoration. Working impressions require high precision and stability to ensure restoration quality. They are typically taken with high-precision impression materials and specialized tools.
- Final impression: In some cases, a final impression is needed to verify the fit and stability of the restoration. This impression is often an adjustment of the working impression to ensure a perfect fit between the restoration and the patient’s oral structures.
Each type of impression serves a different purpose in the dental restoration process. The dentist will choose the appropriate type based on the patient’s specific needs and treatment plan.